This is another Webserver demo using jqueryMobile with a number of functions for communication with EventGhost.
1.) Extract the contents of the file WS - Demoshort.zip
2.) Open the EG.WS.demo.xml with EventGhost
3.) Open the Webserver Configuration and set the html root folder to the "WS-Demoshort" folder you created in step 1. You can also change the port number to your preffered port.
4.) Open your preferred web browser and navigate to your EventGhost's computer's "ip:port". Something similar to this "localhost:8080" or "192.168.1.156:5163".
The index.html page should explain how to go about using the functions. If not, just ask for more clarification. The Websocket functions were written by Pako and Sebastian. Many thanks to them for posting there examples. The script controlling these functions is the "script.js" included in the html/js folder. If you have your own html and jquery mobile files you can attach that script to the head section of your html. Also copy the "script.js" to your html folder.
Notice: This forum has been recovered from an old backup, so some content, links, and dates may be outdated. The forum is currently read-only while we restore sign-in and registration functionality. Details
If you find this forum valuable and would like to help keep it online, donations to help cover hosting and domain costs are greatly appreciated, but never expected. You can support the forum through Buy Me a Coffee or Ko-fi. Thank you for helping preserve the EventGhost community.
Webserver plugin & WebUI demo
- Attachments
-
- WS - Demoshort.zip
- (1.19 MiB) Downloaded 214 times
-
- EG.WS.demoshort.xml
- EventGhost Configuration:
- (13.89 KiB) Downloaded 214 times
Last edited by yokel22 on Sun Dec 04, 2016 11:44 pm, edited 1 time in total.
Re: Webserver plugin & WebUI demo
This is working page with several remotes(kodi,iTunes,Sonos), weather, calculator and other utilities for further example of how to go about using the functions. I've tested this about as well as I can, but there will likely be a few that I missed on my system. Thanks to "eirik226" for helping with the testing. If you get an error or something just isn't functioning properly, let me know and post a screenshot of the error if applicable.
1.) Follow all the steps from the post above.
3.) Open the kodi folder, then this macro "Set KodiArt Directory (EDIT THIS THEN RUN FIRST: Set to your "HTML/images/kodiart" folder)" 4.) Open the Webserver Action here "Webserver: Set persistent value: kodiartdirectory: D://WS - Demo/images/kodiart/" , set it to where the unzip "WS-Demo" folder is located. In my case it's the root of the D: drive. Then run the entire "Set KodiArt Directory (EDIT THIS THEN RUN FIRST: Set to your "HTML/images/kodiart" folder)" macro once.
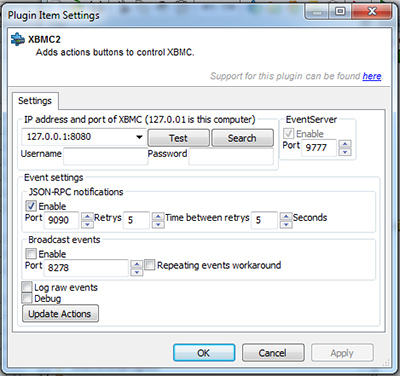
5.) Open the xbmc2 plugin Configuration, set fields to match your kodi settings "listed under services in kodi". It should look similar to this. (make sure to enable events) 6.) Open the Suntracker plugin Configuration and set your location.
6.) If you want to use iTunes you will need to install the updated plugin attached below.
7.) If you are using Sonos, the event's will need to be changed to the events generated by your speakers.
A few screenshots. Some of the less obvious buttons: 1.) Clicking on the kodi icon at the top will pull up this menu. 2.) Clicking on the cover art will pull up the current playlist. 3.) Clicking on the fanart within the current playlist will bring up controls to change items position. 4.) Clicking on one of the stars will set the rating to that value.
1.) Follow all the steps from the post above.
3.) Open the kodi folder, then this macro "Set KodiArt Directory (EDIT THIS THEN RUN FIRST: Set to your "HTML/images/kodiart" folder)" 4.) Open the Webserver Action here "Webserver: Set persistent value: kodiartdirectory: D://WS - Demo/images/kodiart/" , set it to where the unzip "WS-Demo" folder is located. In my case it's the root of the D: drive. Then run the entire "Set KodiArt Directory (EDIT THIS THEN RUN FIRST: Set to your "HTML/images/kodiart" folder)" macro once.
5.) Open the xbmc2 plugin Configuration, set fields to match your kodi settings "listed under services in kodi". It should look similar to this. (make sure to enable events) 6.) Open the Suntracker plugin Configuration and set your location.
6.) If you want to use iTunes you will need to install the updated plugin attached below.
7.) If you are using Sonos, the event's will need to be changed to the events generated by your speakers.
A few screenshots. Some of the less obvious buttons: 1.) Clicking on the kodi icon at the top will pull up this menu. 2.) Clicking on the cover art will pull up the current playlist. 3.) Clicking on the fanart within the current playlist will bring up controls to change items position. 4.) Clicking on one of the stars will set the rating to that value.
- Attachments
-
- WS - Demo.zip
- (14.81 MiB) Downloaded 193 times
-
- EG.WS.demo.xml
- EventGhost Configuration:
- (398.18 KiB) Downloaded 207 times
-
- __init__.py
- iTunes Updated Plugin:
- (45.41 KiB) Downloaded 225 times
Last edited by kgschlosser on Fri Dec 09, 2016 6:48 am, edited 4 times in total.
Reason: Moved files from dropbox to forum server
Re: Webserver plugin & WebUI demo
I have been testing this and learning from it for a while now. In my opinion this is very well done and I definitely recommend it. It shows how well and much eventghost can do! Gave me a smile on my face a few times.
+1 to yokel, and thank you for sharing!
Re: Webserver plugin & WebUI demo
I didn't test it, maybe somewhere next year, but it looks promising. Thank you yokel22 for the effort and sharing your knowledge. 
Re: Webserver plugin & WebUI demo
Looks awesome, looking forward to giving it a try.
Thank you for sharing!